Showing posts with label Die Cutting. Show all posts

February Colour Inspiration


Creative Inspiration with a Colour Combination

Here's this month's colour combination:

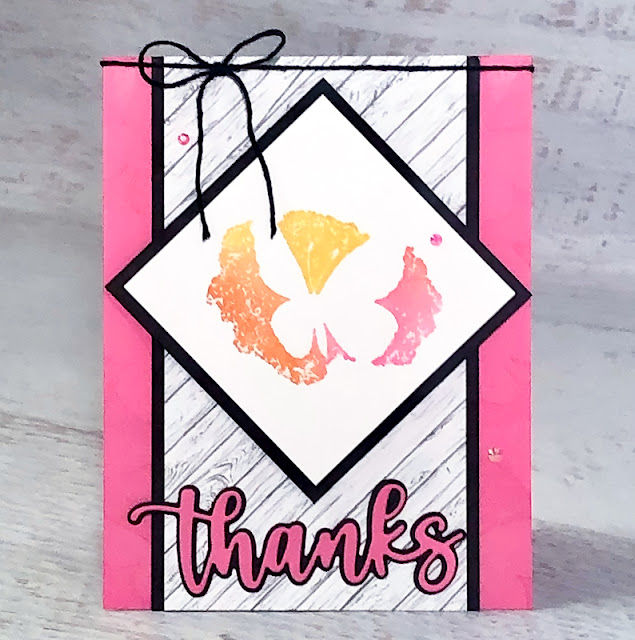
And here's the project it inspired:


This bright card with its motivational sentiment is a simple yet effective way to give a friend a boost.

After starting with a standard card base cut and scored from Melon Mambo Cardstock, a mat was added that was cut from the pink edge of the sunset-toned design from the Enjoy the Journey Designer Series Paper. A rectangular panel was cut from Shimmery White Cardstock using the 4" wide die from the Stitched Rectangle Die Set. A blending brush was used to add Melon Mambo from a Classic Stampin' Pad to one side of the panel. The tall grass image from the Greatest Journey Photopolymer Stamp Set was stamped along the bottom of the panel in Garden Green Classic Ink, and the sentiment was stamped in Tuxedo Black Memento ink in the top right corner. The hiker silhouette element from the Greatest Journey Dies was cut from Basic Black Cardstock, and snips used to remove the lantern so that it could be replaced by a die cut hiking stick. The hiker element was attached to the panel using Stampin' Dimensionals, and the whole panel adhered to the centre of the card front.

Shop my top product picks for this project:
Not only do you save 10% by purchasing the Greatest Journey Bundle instead of the stamp set and dies separately, but by purchasing this bundle you qualify for 1 Level 1 Sale-a-Bration item. The Enjoy the Journey DSP is one of the January-April Mini Catalogue products now available for you to choose as your Level 1 reward.

Amazing Silhouette Card


Many of you may not be aware that I am in Arizona right now and will be away till mid -April.  However, I am still available to you by phone, email or text just as if I was at home.  If you need anything from me at all please reach out and I will help you with whatever you need.

 In February we celebrate love with Valentine's Day. We give cards and gifts to show those we love that we care. I've been thinking about who and what I love and realized I maybe haven't shared something I love with you.


I truly love being a Stampin' Up! Demonstrator. When I purchased the Starter Kit, I never imagined all that came with being a demonstrator. That little investment has led me to amazing friendships, access to a supportive community that keeps my creativity fed, and so much personal growth.

When you join Stampin' Up! during Sale-a-Bration, not only do you get   $165 of Stampin' Up! products of your choice for only $135, but you also get to select any 2 catalogue stamp sets! (Sale-a-Bration and host sets excluded).

Consider joining Stampin' Up! and taking this wonderful adventure with me. I think you will love it, plus, unlike Valentine chocolates, stamping is calorie-free fun!

This month's tutorial features a simple technique perfect for the Dist-INK-tive stamps in the new Amazing Silhouettes bundle!


Can you believe this colourful card was created with a single stamped image? It's true! The butterfly image looks complex but all it takes is ink, Sponge Daubers, and a spritz of water to make the magic!
The Amazing Silhouettes Bundle is really unique, and I love it! It has layering die cut words with the Amazing Thanks Dies and the Amazing Silhouettes stamp set is a Dist-INK-tive set that creates a faux emboss resist effect by stamping "around" the image and leaving a negative space. Try it with patterned paper or heat embossing for even more amazing looks!

As a regular email subscriber you will receive detailed instructions on how to create this card.  If you don't get me emails, stop missing out and sign up now!


Product List

January Tutorial


I'm ready to shake off the old and kick off this new year with positivity and creativity! I hope you'll join me in the challenge of sharing more joy this year.

The new January-June Mini Catalogue is packed with just what you need to kick start your creative projects. If you haven't had a chance to check it out yet, you'll want to make a point to see some of the exciting new goodies.

I'm so giddy about the new Slim Sayings Bundle, that I just had to use it for this month's tutorial. I think you'll love this fresh card style, too!

Sale-a-Bration is happening now through the end of February, so don't miss your chance to get new goodies and earn fun bonus stamps or paper from the Sale-a-Bration brochure with your qualifying purchases or parties!

Detailed instructions for this card are included in my newsletter.  Subscribe today!


Product List

Harvest Meadow Card Tutorial

August-December 2021 Mini Catalogue - Harvest Meadow Suite

Rich Autumn colours and rustic textures make the Harvest Meadow Suite the perfect accompaniment for your fall cards, decor, and events.

The Nature's Harvest stamp set blooms with both beautiful flowers, and sentiments you'll cherish. The coordinating Harvest Die set includes dies that match the stamped images, plus additional coordinating images and labels. The combination provides detail and variety for both your stamped images and greetings.

The tutorial below takes colouring to a whole new level with Stampin' Blends used for colouring stamped images, die cuts, and ribbon! I think you'll love this combination of techniques that you can use again and again.

August-December 2021 Mini Catalogue - Harvest Meadow Suite


Harvest Meadow Autumn Card


August-December 2021 Mini Catalogue - Harvest Meadow Suite

INSTRUCTIONS:


1) Cut Shaded Spruce cardstock to 5-1/2" x 8-1/2". Score at 4-1/4" along the 8-1/2" side. Cut Basic White cardstock to 3-3/4" x 5" and adhere inside card for a writing space.

2) Cut Shaded Spruce diagonal check patterned paper to 3-3/4" x 5". Wrap Twice with Baker's Twine and tie in a bow near the right edge. Adhere to card front with Stampin' Dimensionals.

3) Stamp greeting and flower image on scrap Basic White cardstock with Soft Suede ink. Die cut with coordinating label and flower dies images from the Harvest dies.

4) Colour the die cut flower with the Mellow Moss, Daffodil Delight, Pumpkin Pie, and Cajun Craze Stampin' Blends.

5) Die cut wheat/flower and branch images from scrap Basic White cardstock.

6) Colour the stem of wheat/flower image with the Mellow Moss Stampin' Blends and the flower part with the Blackberry Bliss Stampin' Blends. Colour the branch die cut with Soft Suede Stampin' Blends.

7) Colour a 4" piece of the Pale Papaya & White ribbon with the brush tip of the Dark Pumpkin Pie Marker. This will cover the Pale Papaya and create a Pumpkin Pie ribbon. Allow to dry just a few moments.


8) Use Multipurpose Liquid Glue or Mini Glue Dots to adhere die cut images to card front. Layer ribbon over the top with Glue Dots.

9) Adhere greeting over ribbon with Mini Glue Dots or Stampin' Dimensionals.


TIPS: Create custom ribbon with Stampin' Blends. Start with a white ribbon or a light colour ribbon similar in tone to your chosen colour. Colour the ribbon using the brush tip of a Stampin' Blends marker. You can create a solid colour, ombre, or rainbow effect. Because Stampin' Blends are alcohol-based the coloured ribbon dries quickly and is ready to use without a long drying time.

Product List