January Colour Inspiration

JAN 2020-Color Colour Inspiration - beat the winter blues with bright colours and florals ‌ ‌ ‌ ‌ ‌ ‌ ‌ ‌ ‌ ‌ ‌ ‌ ‌ ‌ ‌ ‌ ‌ ‌ ‌ ‌ ‌ ‌ ‌ ‌ ‌ ‌ ‌ ‌ ‌ ‌ ‌ ‌ ‌ ‌ ‌ ‌ ‌ ‌ ‌ ‌ ‌ ‌ ‌ ‌ ‌ ‌ ‌ ‌ ‌ ‌ ‌ ‌ ‌ ‌ ‌ ‌ ‌ ‌ ‌ ‌ ‌ ‌ ‌ ‌ ‌ ‌ ‌ ‌ ‌ ‌ ‌ ‌ ‌ ‌ ‌ ‌ ‌ ‌ ‌ ‌ ‌ ‌ ‌ ‌ ‌ ‌ ‌ ‌ ‌ ‌ ‌ ‌ ‌ ‌ ‌ ‌ ‌ ‌ ‌ ‌ ‌ ‌ ‌ ‌ ‌ ‌ ‌ ‌ ‌ ‌ ‌ ‌ ‌ ‌ ‌ ‌ ‌ ‌ ‌ ‌ ‌ ‌ ‌ ‌ ‌ ‌ ‌ ‌ ‌ ‌ ‌ ‌ ‌ ‌  ;‌ ‌ ‌ ‌ ‌ ‌ ‌ ‌ ‌ ‌ ‌ ‌ ‌ ‌ ‌ ‌ ‌ ‌ ‌ ‌ ‌ ‌ ‌ ‌ ‌ ‌ ‌ ‌ ‌ ‌ ‌ ‌ ‌ ‌ ‌ ‌ ‌ ‌ ‌ 
SALE-A-BRATION - Helen Piaskowski

Hello Stampers;

I'm ready to beat the winter blues with bright colours and florals. Are you getting ready for Spring, too?

The new Mini Cut & Emboss Machine is now available - hooray! This little cutie is perfect for having at your desk or taking with you to crafting events. With it's low price it's the ideal tool for new crafters to get started with die cutting and embossing. Avid crafters will love the convenience of having a cutting and embossing tool right at their finger tips, without loosing valuable crafting space. When you purchase your Mini Cut & Emboss Machine during Sale-a-Bration you'll also earn a reward item, so treat yourself to this fun tool today!

This month's Colour Inspiration is a celebration of bright spring colours, caring thoughts, and happy occasions. It features a selection of Sale-a-Bration stamps and papers that you can qualify to earn with your orders in January and February.  Contact me to learn more!


COLOUR INSPIRATION

Blackberry Bliss
Highland Heather
Granny Apple Green

I'm ready for all things Spring! How about you? Blackberry Bliss may not come to mind as a spring colour, but when combined with the soft Highland Heather and bright Granny Apple Green it makes the perfect mix for both floral and birthday cards!

Combining the three colours with the Baby Wipe Stamping Technique creates a beautiful, soft watercolor effect with the Corner Bouquet stamp set.

This month's Colour Inspiration Project

The Approaching Perfection birthday card is a fun, simple design that's great for the young and the young at heart!

What will you create with this gorgeous colour combo?

This month's Colour Inspiration Project

SUPPLIES

Corner Bouquet (Sale-a-Bration) #155273

Corner Bouquet (Sale-a-Bration)

MORE
Heal Your Heart (Sale-a-Bration) #155291

Heal Your Heart (Sale-a-Bration)

MORE
Oh So Ombre Designer Series Paper (Sale-a-Bration) #155225

Oh So Ombre 
(Sale-a-Bration)

MORE


Always in My Heart Tutorial

The Annual Catalogue Inspiration

Love You Always Suite

Love is always in season and the Love You Always suite is always in style. It's perfect for when you are sharing a Valentine with your sweetheart, creating treats for the kids, or sending wedding or anniversary well wishes.

This tutorial creates an beautifully detailed card perfect for Valentine's Day or an anniversary. The subtle details of pattern, shimmer, and texture combine to make a special card that you need to create and see in person to truly appreciate!
--------------------------------------------------

Always in My Heart Card

Always in My Heart Card

Join my Email Newsletter List and receive my tutorials by email. With each mailing you will receive a picture of the finished project, a supply list, card layout, and a step-by-step tutorial.


Always in My Heart Card
 
INSTRUCTIONS:

1. Score 5-1/2" x 8-1/2" Pool Party cardstock at 4-1/4" along the 8-1/2" side and fold. 

2. Cut the Pool Party gesso textured pattern of the Fine Art Floral Designer Series Paper to 5-1/2" x 4-1/4" and adhere to the card front. 

3. Cut Vellum cardstock to 4-3/4" x 3-1/2". Add Stampin' SEAL near the center of the vellum where it will be covered by the other layers and adhere the vellum centered on the card front. 

4. Add 2 stripes of Stampin' SEAL vertically near the center of the vellum layer, where it will be covered by other layers. Zig zag a 16" piece of the Pool Party Sheer ribbon, starting at the left edge near the top and ending at the right edge closer to the bottom.

5. Die cut Pearlescent Specialty Paper with the floral heart image from the Floral Hearts dies. Keep both the heart wreath and the heart cut from the center. Adhere both pieces to the card front with Stampin' Dimensionals or Glue Dots.

6. Die cut about 6 leaf shapes from Old Olive and Granny Apple Green cardstock with the Floral Hearts dies and layer onto the edges of the heart wreath with Glue Dots. 

7. Stamp Basic White cardstock with the two 2-step flower images shown. Stamp the outline image of one flowers with Petal Pink ink and a second with Poppy Parade ink. Stamp the outline image of the other flower in Bumblebee ink and a second with Calypso Coral ink. Stamp the coordinating solid image for each flower in the same colour, but stamp it off once or twice before stamping to get a lighter fill colour.

8. Die cut the flowers with the coordinating dies, it's easy to do since the die set includes 2 dies of each flower! Add flowers to the heart with Stampin' Dimensionals or Mini Glue Dots. 

9. Stamp scrap Pool Party cardstock with the "Happy Anniversary" or "Be My Valentine" image using Pretty Peacock ink. Die cut with the banner. Fold the banner ends on the score lines to make it appear 3D. Add the banner to the card with Glue Dots on the ends and Stampin' Dimensionals in the center. 

10. Add about 5 Gold Glitter Enamel Dots in various sizes to the heart and the card.

TIPS: When adding Vellum Cardstock to projects, place adhesive where it will be covered by other layers of cardstock, ribbon, or embellishments, so that you don't see the adhesive through the translucent vellum paper. 


Love You Always Suite


Product List
VIEW THE SUITE ONLINE

DOWNLOAD OUR LATEST CATALOGUE

Love You Always Suite

Treat Box Tutorial

January - Tutorial The matchbox-style box can be assembled without any adhesive. Decorate, add candy, and a sweet note. ‌ ‌ ‌ ‌ ‌ ‌ ‌ ‌ ‌ ‌ ‌ ‌ ‌ ‌ ‌ ‌ ‌ ‌ ‌ ‌ ‌ ‌ ‌ ‌ ‌ ‌ ‌ ‌ ‌ ‌ ‌ ‌ ‌ ‌ ‌ ‌ ‌ ‌ ‌ ‌ ‌ ‌ ‌ ‌ ‌ ‌ ‌ ‌ ‌ ‌ ‌ ‌ ‌ ‌ ‌ ‌ ‌ ‌ ‌ ‌ ‌ ‌ ‌ ‌ ‌ ‌ ‌ ‌ ‌ ‌ ‌ ‌ ‌ ‌ ‌ ‌ ‌ ‌ ‌ ‌ ‌ ‌ ‌ ‌ ‌ ‌ ‌ ‌ ‌ ‌ ‌ ‌ ‌ ‌ ‌ ‌ ‌ ‌ ‌ ‌ ‌ ‌ ‌ ‌ ‌ ‌ ‌ ‌ ‌ ‌ ‌ ‌ ‌ ‌ ‌ ‌ ‌ ‌ ‌ ‌ ‌ ‌ ‌ ‌ ‌ ‌ ‌ ‌ ‌ ‌ ‌ ‌ ‌ ‌ ‌ ‌ ‌ ‌ ‌ ‌ ‌ ‌ ‌ ‌ ‌ ‌ ‌ ‌ ‌ ‌ ‌ ‌ ‌ ‌ ‌ ‌ ‌ ‌ ‌ ‌ ‌ ‌ ‌ ‌ ‌ ‌ ‌
Love You Always Suite Tutorial - Helen Piaskowski


Now that the new January-June Mini Catalogue and Sale-a-Bration have arrived, it really does feel like a joyful New Year! I am so looking forward to more creative time and the chance to connect with my friends, even if life isn't quite normal yet. I truly feel that any way we can share time together is better than missing the opportunity.

Speaking of opportunity, have you had the opportunity to check out the awesomeness that is the new January-June Mini Catalogue? There are so many new things that I'm excited about that I just can't choose where to start.  New products, project inspiration, and ideas I'm looking forward to sharing with you!

This month's tutorial features the gorgeous Love You Always Suite. I think you'll love this treat box and mini card combo that you can use to give a treat to your sweetheart and other loved ones!


Treat Box with Mini Card Top

Project Inspiration
Project Inspiration
Project Inspiration

The matchbox-style box can be assembled without any adhesive and comes in two pieces, the box and the sleeve. The sleeve is fully assembled just pop the flat-folded piece open.

  1. Fold the box on all scored lines.
  2. Fold the small tabs in and fold the side flaps over the tabs. The small end section flattens at the bottom of the box.
  3. Fold the shorter front section over and press the small end section flat at the bottom of the box.
  4. Fold the long back flap over the box opening.
  5. Press down so the short section folds inside the box and the long section flattens onto the bottom of the box. The tab at the end slides into the slot in the bottom corner to hold the box securely.
  6. Slide the box into the sleeve like a drawer.
Project - Box Step 1
Project - Box Step 2
Project - Box Step 3
Project - Box Step 4
Project - Box Step 5
 Project - Box Step 6
Project - Step 1

1. Cut & Colour True Love Paper

Colour a flower image from the True Love Designer Series Paper with Petal Pink and Granny Apple Green Stampin' Blends. Cut out with Paper Snips. Alternately stamp, die cut, and colour the flower images from the Forever & Always Bundle (#156200).
Project - Step 2

2. Cut & Layer Paper

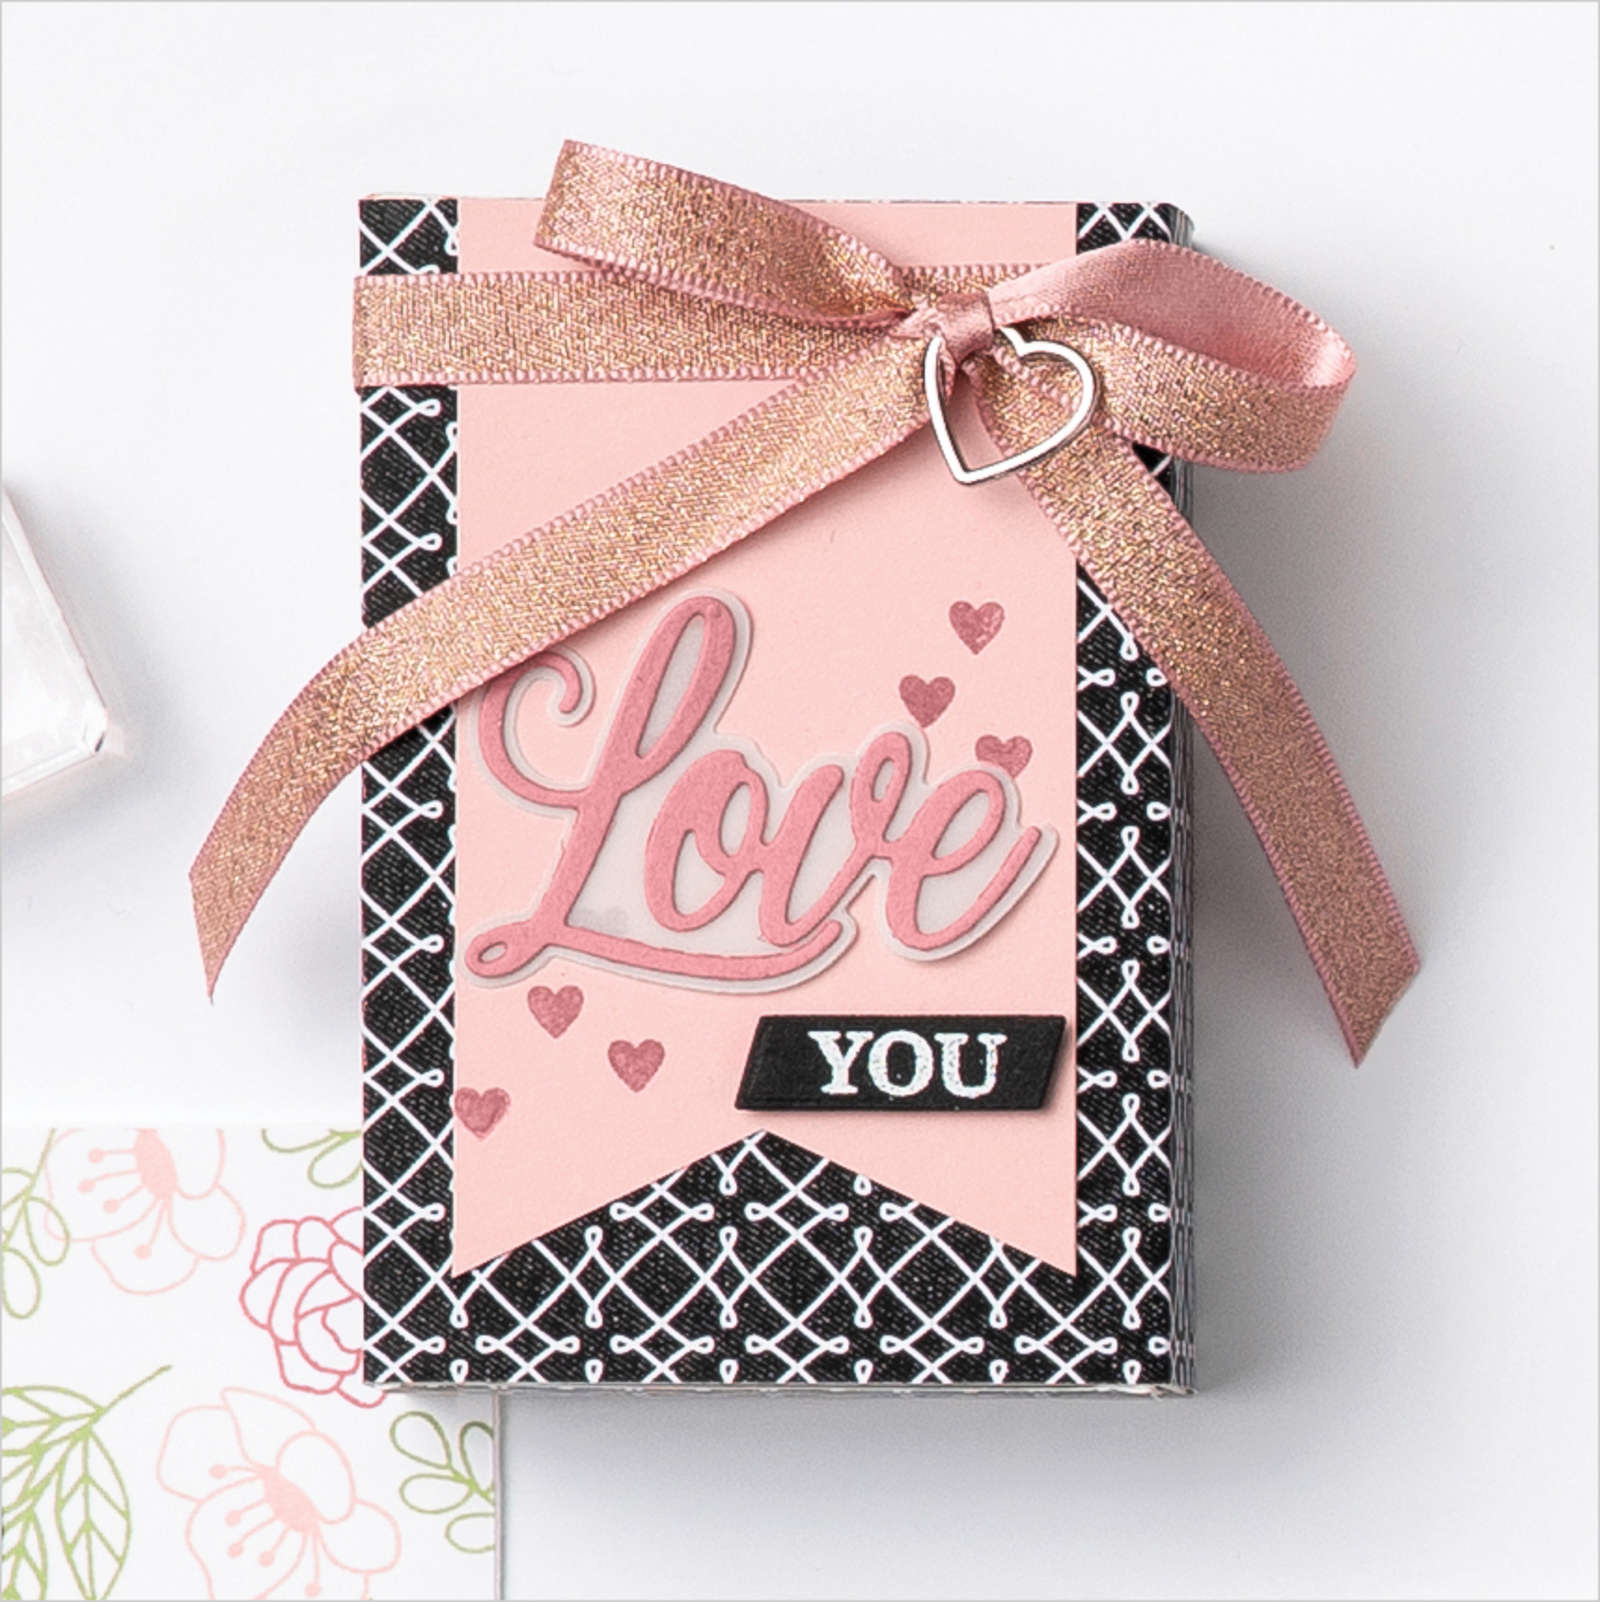
Score 4-1/2" x 3-1/2" Rococo Rose cardstock at 2-1/4" along the 4-1/2" side. Cut the following: Early Espresso cardstock 2-1/2" x 3-3/4", Petal Pink 2" x 3-1/4", Sahara Sand Love You Always Specialty Designer Series Paper 2" x 3-1/4". Fold the Rococo Rose mini card, adhere to Early Espresso layer. Adhere Petal Pink layer inside mini card.
Project - Step 3

3. Add Ribbon & Heart Charm

Adhere 3" pieces of Blushing Bride 3/8" Metallic Ribbon paper. Adhere ribbon ends behind the paper with Stampin' SEAL. Adhere to card front with Stampin' Dimensionals. Thread charm onto 6" piece of Gold tread from Forever Greenery Trim Combo Pack (#152475). Knot the thread around the heart and create a loop. Adhere loop in place with Stampin' Dimensionals.
Project - Step 4

4. Cut & Fit Belly Band

Cut Petal Pink Love You Always Specialty Designer Series Paper to 3" x 10". Save the 3" x 2" cut-off piece for later. Starting about 1/8" from the seem on the box sleeve, wrap the paper around the box. Use your fingers to create a bit of a crease at each corner.
Project - Step 5

5. Crease Folds

Use a Bone Folder to crease each corner fold. Make sure the edges of the paper stay lined up as you crease the folds.
Project - Step 6

6. Add Belly Band

Use Tear & Tape or Stampin' SEAL+ to adhere Belly Band around the box starting with the shortest section near the seam of the box sleeve.
Project - Step 7

7. Add Card & Bow

Use Stampin' SEAL+ or Tear & Tape to adhere card centered on the top of the box. Add colored flower to the Stampin' Dimensionals on the card. Tie a bow with a 14" piece of ribbon and adhere to box with Glue Dots.
Project - Step 8

8. Finishing Touches

Adhere 3" x 2" Petal Pink Love You Always Specialty Designer Series cut-off piece to 2-1/2" x 3-7/8" Early Espresso cardstock. Adhere layers inside the bottom box for a fun finishing touch.
Project - Step 9

9. Add Sweets

Add candy, a sweet note, or small gift to the box and share the love!


Product List